California Golf Instruction – Chipping Set-Up 1 – Grip and Stance
At our Cahill Golf Schools California golf instruction here in Palm Springs we teach this method for most players. I have yet to meet a student that has not gained more control and consistancy using this method. From both an engineering perspective as well as a playing perspective it just makes sense. This video covers two of the basics on set-up for using this chipping method, the grip and stance.
California Golf Instruction – Chipping Grip 1
The grip for chipping around the green is quite different than the grip used for the full swing, and it should be. When making a full swing we are trying to power the ball to our target. In that type of swing we need the hands to hinge and create an extra lever that will provide more speed to the clubhead. For chips around the green not only is power unnecessary, it can be detrimental. For chipping we are looking for maximum control. At our Cahill Golf Schools California Golf Instruction we teach that there are three main differences in the power grip or full swing grip when compared to the chipping grip.
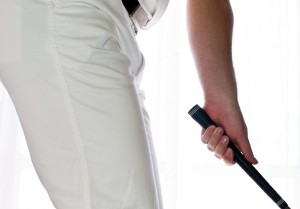
Grip being placed under the bottom of the left hand. This is a full swing grip, not a chipping grip.
California Golf Instruction- Chipping Grip Change 1:
At our California golf instruction golf schools the first change we make for chipping is to take the club from the bottom of the hand and place it more in the palm of the hand. Doing this allows the shaft of the club to be more on plane with the arms, simplifying the chipping swing and increasing control. Keep in mind this is for chipping and not used on the full swing.
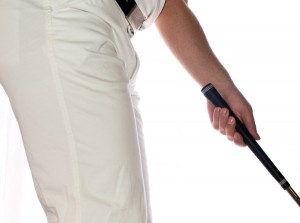
The club is properly placed in the left hand’s palm for chipping. Notice the shaft is now in line with the forearm.
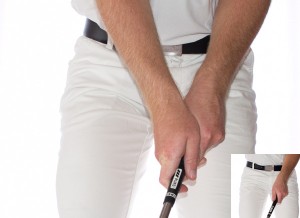
These picture show how the hands are situated for a full swing grip. Notice how the top left hand is visible and turned to the left.
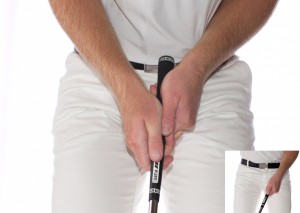
Correct grip postion for a neutral chipping grip. Both thumbs are going down the shaft, the top of the hand is much less visible.
California Golf Instruction – Chipping Grip Change 2:
The second chipping grip change we make for our California Golf Instruction we make is making both hands more weak, or neutral on the grip. This means that we will be turning the left hand to the left and the right hand to the right before applying pressure to the grip of the club. When you look down at your hands after you have gripped the club you should see both thumbs going down the shaft. We should not see the 2,3 or 4 knuckles on the left hand in an address position.
This change makes the club head more balance throughout the chipping motion and through impact. It also makes it more difficult for the student to open or close the face during the swing. A easy way to prove this to yourself is to put only one hand on the club at a time. First put your left hand on the club in your standard power grip or full swing grip position. From an address position looking down at the hands you should see three knuckles. Gripping the club with light pressure go ahead and turn the face shut by rotating your hands to the left. The face will be very easily closed. Now put the neutral more weak chipping grip on the club, again gripping the club with light pressure rotate the face to the left. In the chipping grip position the face will be much more difficult to close. You can repeat the precess comparing the right hand by rotating each grip position to the right.
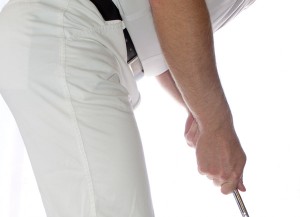
The hands are placed correctly on the golf grip with two fingers on the steel. Notice that the grip does not show below the right hand.
California Golf Instruction – Chipping Grip Change 3:
The final grip change we are going to make is gripping down on the club. The reason we grip down is to shorten the swing’s lever length and swing arc. The lever is the distance from where the arms touch the body and extend to the clubhead’s sole. This change makes the club and chipping swing more controllable. To begin for our standard chip, grip the club with 2 fingers of the right hand on the steel just below the rubber. The “chipping set-up 2” video and page go more in depth on this change. This change also directly relates and leads us into our chipping stance.
California Golf Instruction – Chipping stance
The stance that we use for our California golf instruction in this chipping method is directly related to the amount of power we are attempting to apply to the ball which is directly related to the length of the lever. For shorts shot we want a shorter lever, for longer shots we want a longer lever. As we talked about in the grip section the lever is the length starting at where the arms attach to the body and extends to the bottom of the clubhead. As we address the ball with shorter and shorter levers our spine angle begins to become more flat with the ground. This will also cause the clubshaft to become upright. The upright shaft would not be a problem within itself, but do to the lie angle of of any golf club the face angle is adjusted with the shaft angle. As the lie angle of the club becomes more upright the face also begins to point right of the target. So we need to find a way to make a simple adjustment that offsets the increased toe-down, heel-up effect on the lie angle of the clubface. This is where a change in our stance comes into play. Our goal with stance is to allow our spine angle to be maintained no matter what length lever we have created.
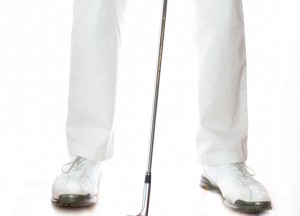
This is the standard full swing stance width. It works great for any shot that we are gripping at the full club length. As the shot gets shorter and we grip down on the club more our stance should get wider to adjust for the shorter club.
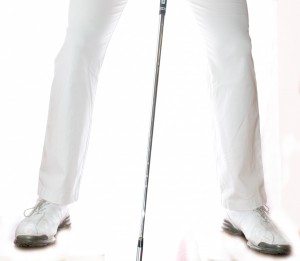
This stance width is about 8″ wider than our full swing stance. We can go much wider than this depending on the shot length and the amount we have gripped down on the club.
California Golf Instruction – Chipping Stance Change:
Simply adjust the width your feet are apart depending on how much you gripped down on the club. By widening you feet your are creating a shorter base. The shorter base work directly in tandem with your shorter more controllable lever. For a standard chipping set-up with two fingers on the steel the feet should be about 14 inches wider than shoulder width. This of course depends on how tall you are to begin with and your individual body makeup. As we get into very short chips, say 2 to 5 feet, and we have put both hands on the steel then an ultrawide 48″ stance would be in perfect order.
Don’t be afraid to go too wide with your stance as you grip down lower and lower on the club. I doesn’t look as strange as you might feel. To know when your stance width is just right keep an eye on the lie angle of your wedge, the middle of the sole should be flush with the ground. For more instruction on this subject take a Cahill Golf School -California Golf Instruction at Cimarron Golf Resort.