Golf Fitness Rotator Cuff With Mike Cahill
This video and article focuses on a great golf specific exercise that we use at our California golf schools for strengthening and stretching the rotator cuff. We often see students come to our California golf school with limited motion in their rotator cuff. This limitation makes a full on plane backswing difficult or even impossible. This simple golf specific exercise can be used to quickly stretch and strengthen a tight or weak rotator cuff. This article is part of Cahill Golf’s California Golf Schools Golf Fitness Video Series.
California Golf Schools – What is the rotator cuff and what does it do in the golf swing?
The rotator cuff is simply a group of four muscles and tendons that stabilize the shoulder. In golf a rotator cuff that is not flexible enough will limit the raising of the arms in the backswing. This limitation disallows not only a full backswing but also an on plane position at the top of the backswing. A rotator cuff that is too weak will not only tire during practice and play and duly cause unwanted positions but can also injure more easily than a strong rotator cuff.
From our perspective at our California Golf Schools the most important rotator cuff is the one on the dominant arm. This arm’s rotator cuff is subject to a strong sideways stretch similar to that of a pitcher in baseball. Although we focus on both arms at our California golf schools this rotator cuff plays a major role in the golf swing.
California Golf Schools – How to complete the exercise.
This is really a series of similar exercises rather than a single exercise. This series of exercises targets each of the four muscles in the rotator cuff. Although not completely isometric this exercise uses the body’s own forces against one another.
1. Begin standing tall with your feet shoulder length apart.
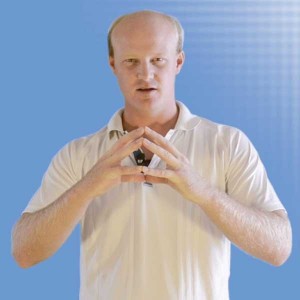
2. The first exercise begins with each of your fingertips and thumbtips touching one another. Your elbows and hands should be at chest height.
- Push as firmly as you can against the opposing hand keeping only the tips of the finger and thumbs touching.
- Keeping the pressure as firm as you can begin rotating small circles away from your chest. These circles should begin by raising the hands slightly.
- Gradually make the circles bigger until you reach 10 repetitions.
- Now begin small circles again, but begin the rotation by slightly lowering the hands in the opposite direction of the previous repetitions.
- Continue making the circles larger through 10 repetitions.
3. The second exercise is a static pulling motion with similar circles.
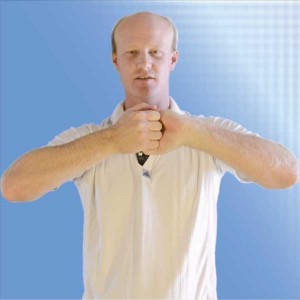
- Cup the fingers in both hands and link the cupped fingers together.
- The top of the right hand is toward your chest and the left is away.
- Pull as firmly as you can throughout the exercise.
- Begin concentric circles through 10 repetitions.
- Repeat 10 repetitions with the top of the left hand facing you chest and the right hand away from the chest. Slow, pulling firmly repetitions.
4. Exercise three continues in the same manner.
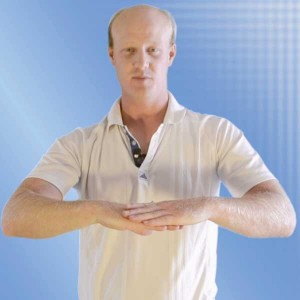
- Place the right hand on top of the left hand with the top of both hands facing the sky.
- Push down firmly with the right hand and up firmly with the left hand.
- Begin concentric circles with the hands moving in the upwards direction, continue through 10 repetitions. Repeat with hands reversing direction (beginning with the hands lowering)
- Now repeat with the left hand on top of the right hand. 10 repetitions beginning with hands rotating up and 10 with hands reversing direction (beginning hands rotation down)
These 3 exercises will cover all four of the rotator cuff muscles and will both strengthen and stretch them out for golf. Don’t worry if it seems tiring the first few times completing these exercises, it is quite normal. In less than a week you will find better strength, flexibility, and endurance in these muscles. Continue to do these exercises before each practice session or round of golf. Come to our California golf schools at Cimarron Resort to learn more in this routine.


