Golf Instruction Schools – Chipping Set-up 2 -Bracketing
The second video in our Cahill Golf Instruction Schools video golf school chipping series is on the second part of set-up for this chipping method. This section goes more in depth on grip postion as well as the all important bracketing of the arms against the ribs. It covers why it works so well and how to get into this effective position.

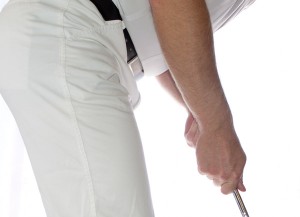
The right hand has two fingers touching the steel. The grip postion on the club changes depending on the amount power desired.
Golf Instruction Schools – Chipping Grip Position
Here rather than holding the club at the end of the grip we want to grip down on the club. The amount we want to grip down depends on the length of the shot. Generally we want to grip down as much as we can that will still allow us to generate enough power for the shot we are planning on hitting. For a standard chip 10 to 20 feet in length having 2 fingers on the steel is usually about right. At Cahill Golf instruction schools we teach that shorter shots will require gripping down more and longer shots will require gripping down less.
Gripping down on the club makes the club more controllable. First it shortens the entire lever that begins where the arms touch the body and ends at the face of the club. The shorter the lever the more controllable it is, simple physics. The short lever also allows the turn of the body to be more aggresive through impact. Helping us especially on short chips to accelerate the club through impact.
As I said earlier depending on the shot we are trying to hit we will adjust the amount we grip down on the club. As we grip down we also need to make an adjustment that works with the shortened lever we have created. This brings us to chipping stance.
Golf Instruction Schools – Bracketing
In our chipping set-up and chipping motion bracketing is one the most important aspect to follow. For most of our students at Cahill Golf instruction schools it is the biggest difference in feel for players that have already established a chipping motion. It however usually only takes a couple of hours for them to get comfortable and more effective with bracketing than without it. Bracketing again shortens the lever in the golf swing as well as acting as brace for the club.
Bracketing Term – Golf Instruction Schools
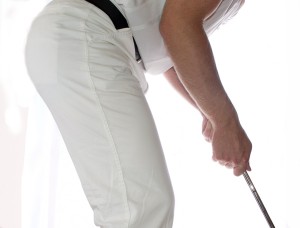
Bracketing is the term we use at our Cahill Golf instruction schools for connecting the arm to body. Specificly the arms will be connected to the body by keeping the elbows tucked against the front of the ribs. Once in the elbows are tucked and connected to the front of the ribs they stay there throughout the swing.
Bracketing Theory – Golf Instruction Schools
We talked about shortening the lever in the golf swing in set-up 1 as well as the grip postion section above. We shorten the overall lever of the golf swing because we don’t need the unnecisary length of fully extended arms and a full club length, nor do we want the clubhead speed that provides. Not only do we not need it, that length and clubhead speed becomes detrimental in chipping. The bracketing of the arm against the ribs shortens the overall length of the lever and when used with the postitioning the hands lower on the club it provides us with shorter and massively more controllable lever.
A secondary benefit to bracketing the elbows to the ribs is the amount of arm movement it prevents by the way it connects the lever to the body. The chipping swing is a simple turn of the shoulders rotationally right into the backswing and a simple turn of the shoulders rotationally left in the forward swing. Any extranious or extra movement with the arms causes distance, direction and ball contact problems. Bracketing virtually eliminates the ability to move the arms throughout the swing. If the original position of the elbows being tucked to the ribs is held from address to finsh then the arms simply follow the motion of the shoulder turn and any extra movement is eliminated.

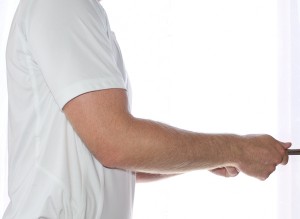
The easiest way to get yourself into the “bracket” position is to begin with your arms straight at shoulder height. From there pull your elbow into the front of your ribcage.
How to Bracket – Golf Instruction Schools
The easiest way to get into the bracket position is to hold your arms straght in front of you making sure we have already made the correct grip changes. The forearms and the shaft should be on the same plane or level with each other. This means that you could lay a board flat on you forearms and shaft. From this straight arm position pull your arms toward your the front of your ribs and hold them tucked there. We are currently in a bracketed position. This position should be help from adress through the swing into the finish. For more on bracketing come to a Cahill Golf instruction school in Palm Springs CA at Cimarron Golf Resort.
