Step-by-Step Golf Swing Takeaway
Getting the Club Moving
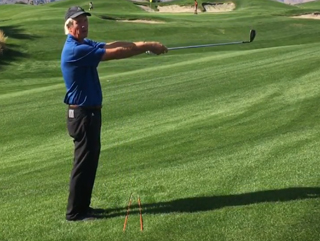
Rotational Motion Drill: This motion replicates the movement of the club around the center points of the body during the swing.
Setup for Drill: Stand with heels 12” apart and the center points of the hips, sternum and head in alignment. Grip your club.
Rotation Drill: Hold the club straight out in front. Rotate first right and then to the left. The hips and shoulders turn together rotating around the center points of the body.
The hips and shoulders rotate around and perpendicular to the spine.
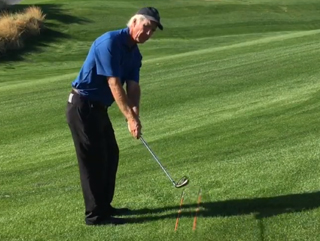
Lay an alignment stick on the ground pointing at your target (target line). Place your ball centered, against the address side of the stick.
Grip your club. Aligning yourself to the target with heels 12” apart. Get into your address position. Place the club face behind the ball. Turn hips and shoulders together along the target line, rotating around and perpendicular to the spine. It will feel like your lead shoulder is moving underneath as the hips and shoulders rotate perpendicular around the spine.

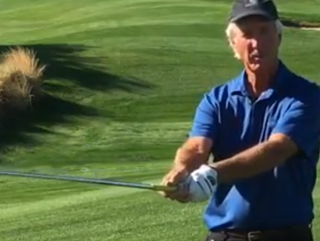
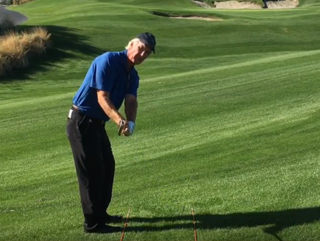
During takeaway move the golf club down the line, straight back.
Turn the hips and shoulders together bringing the toe of the golf club straight back down the target line (alignment stick). When the butt end of the golf club shaft is even with the outside of the right thigh the club will move away from the target line. Continue turning the hips and shoulders together until the club shaft is parallel to the ground.
During takeaway the hands and wrists remain quiet.
Do not move the hands, wrists and club up and down. Do not move the hands, wrist and club side to side. Keep the hands, wrists and club quiet while moving them back along the target line.
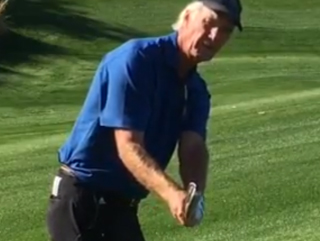
Allow the right (trailing) elbow to fold during takeaway.
When the club shaft is parallel to the ground, the right bicep remains connected to the torso. The right elbow, relaxed, has begun to fold or bend slightly.
Review: Using the alignment stick for guidance, align to the target line and place the club face behind the ball. The hips and shoulders turn together rotating around the center points of the body. Turn the hips and shoulders together bringing the toe of the golf club back along the target line. When the butt end of the golf club shaft is even with the outside of the right thigh the club will move away from the target line. The right bicep remains connected to the torso. The right elbow, relaxed, has begun to fold or bend slightly. The right wrist has flexed slightly away from the palm of the hand. The left wrist is flattened (zero degrees of bend). The club shaft is parallel to the ground.
The club shaft is parallel to the ground. Notice at this point the club shaft is not only parallel to the ground, it is also parallel to the foot line. If an alignment stick where placed across the foot line the club shaft would be in line with the foot line. Notice the angle of the club face. The toe of the club is not directly straight up in the air nor open to the right. Rather the face has a slight tilt to it. The tilt angle of the club face is the same as the tilt angle of the spine angle. Notice the butt end of club is the same height as at address. Notice the butt end of the club is on the same line as it was at address.
For the first post in the Step-by-Step series see the post Step-by-Step Golf Address
PGA Instructor Mike Cahill and PGA Master Instructor Dave Cahill are here to help you play better and enjoy the game more. Please come see us in Palm Springs CA for golf lessons or visit us for a Palm Springs, CA or Las Vegas, NV Golf School.
PGA Instructor Mike Cahill 612-501-9015 mikecahill@cahillgolf.com
PGA Master Instructor Dave Cahill 952-994-0387 davecahill@cahillgolf.com