Golf Schools CA – Chipping Motion 1
The section and video covers the chipping motion taught by Cahill Golf Schools CA. It is imperative that the sections on chipping set-up have been understood before covering the motion as they are the basis of the motion. If you haven’t had a chance to look at them please take a look at “chipping set-up 1“, “chipping set-up 2” and “chipping set-up 3” now.
The great thing about learning the chipping motion is that it is unbelievably simple once we have the proper set-up in place. Really all we need to do is hold the set-up we already created in place and then simply rotate the shoulders. I will go a little bit more in depth on how the shoulders rotate in the following sections. Take a look at our Cahill Golf Schools CA chipping motion video 1 and article.
Cahill Golf Schools CA – Holding the Set-up for the Chipping Motion
Holding the set-up means keeping the position you already applied during your set-up throughout the entire swing. This includes the grip changes, the stance, bracketing and the shift of the body centers. Lets think about these one by one.
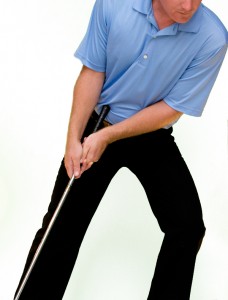
Here the wrist are active in the chipping motion causing the club head to out pace the swing. This causes major problems.
The grip itself is pretty easy to not change during the swing, I do however sometimes see students readjusting it just before the takeaway without realizing it. This is just a matter of getting used to the new position, a half hour of practice with it will get you comfortable and not readjusting it. Once it is set correctly, keep it in place with gentle pressure.
The wide chipping stance is extremely easy to not adjust during the swing. To the point in fact that adjusting it’s width would be difficult and bordering on ridiculous. As long a we are not changing our body center throughout the swing the wide stance should remain constant through swing.
Holding the bracketing portion of the set-up during the swing for many people is the hardest part of the swing motion. It is however one of the most important parts. To have a consistent and accurate chipping motion the student must use shoulder rotation and not an arm swing. The bracketing of the elbow into the ribs should be held from address to finish. It is what keeps the arm from being involved in the swing. Players that have previously used an arm swing to chip will feel a large change in the amount their shoulders rotate.
Bracketing also is a factor in considering wrist bend. The bracket begins at the elbows and extends to the club head and is gently rigid and static. The amount the wrists should bend or cock in the chipping back swing is exactly none. Meaning that the same static position the hands and wrists are at address should be held from address to the finish. As with any chipping style the moment the hands force the club head past themselves the player begins to hit fat shots and thin shots with great consistency.
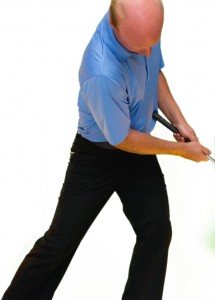
The centers are correctly held in place from address into the finish. We see the head remains in its address position throughout the motion.
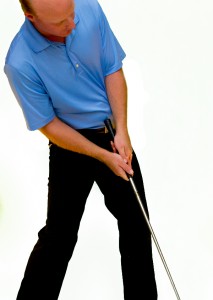
The body centers have incorrectly moved backwards in the chipping motion. We see this often at our golf schools. It is an easy fix.
When the body centers shift toward the target in our set-up they need to stay in that position throughout the swing motion. I often see students begin in a great position with their centers moved forward 4 inches or so and throughout the chipping motion manage to finish with 99% of their weight on their back foot. This causes the ball to become a moving target through the swing. As the centers of the body move from in front of the ball to behind it, the ball is comparatively moving forward while we are trying to connect with it. Golf is hard enough without creating a moving target. Keep the swing simple and keep your center stable throughout the swing.
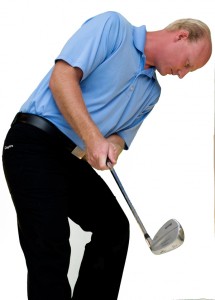
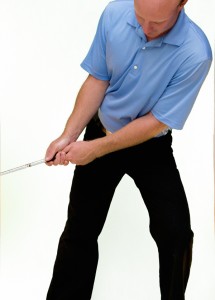
Here we see that both the shoulders and the club shaft are correctly on plane. Notice how both are much steeper than the off plane photo.
Cahill Golf Schools CA Shoulder Rotation
At Cahill Golf Schools CA we teach students that shoulder rotation is what creates the movement in our swing. As I talked about it in the “holding the set-up” section above the shoulder rotation and not an arm swing create movement in the chipping. If we are in the correct bracketed set-up and we hold that position the body is forced to use shoulder rotation to take the club into the back swing. If the elbows are connect to the body at the ribs and the wrist cannot (they technically can move, but they shouldn’t) move then there is no other way for the body to create movement of the club head. That is a good thing because if we set up correctly then the shoulder rotation is forced into the swing.
We also do want to be conscious of the direction we are rotating the shoulders. This is also called “shoulder plane” and it directly relates to “swing plane”. Shoulder plane is plane of the shoulders and swing plane is the plane the shaft is on. To envision what swing plane is simply think about watch a player from behind him and his target think about the angle the club is at in our address position. On that angled shaft envision a board or a piece of glass laid on that shaft extending to the target, back towards us and cut through the player. The club shaft should rotate on that plane in the back swing and past impact in the forward swing.

This is an example of both the club shaft and the shoulders off plane. The golf club shaft plane is drastically shallow here. This will cause directional as well as contact and consistency issues for the chipping motion.
Shoulder plane is simply the plane the shoulders rotate on. You cannot see a players ideal plane from behind at address the same way we can see the swing plane but its intended plane should be similar to the the angle of the swing plane. The end of the back swing in the chipping motion is the place to see the shoulder plane, draw or picture a line from shoulder to shoulder. It should be relatively bent toward the ground similar to the swing plane. If it is flat or close to flat with the ground with the ground the shots will inconsistent in inaccurate.
During the chipping motion we want the shoulders to rotate without the help of the arms on a shoulder plane parallel to the swing plane. If this is confusion the first time you read through it, I suggest re-reading it a few times until it clicks. If it doesn’t click after re-reading it feel free to email us or come a take a Palm Springs Golf School CA from us at Cimarron Golf Resort.
